Decorative Take-out Boxes

My friends and I hosted a baby shower a couple weeks ago. We decided to have fortune cookies dipped in chocolate and sprinkles for our favors in honor of Chinese New Year (Feb 14th this year).


We bought take-out boxes online, took them apart and cut out scrapbook paper to fit around them. Then we glued the paper on, and put the boxes back together. It was super easy, but it took us about 2 hours to make 20 while chasing our 14 & 18 month-old kids and a new puppy.

While we were putting them together I thought it would be fun to be able to make your own take out box out of whatever scrapbook paper you had on hand, so I made a couple templates to share. Both of them are for a smaller box like I have pictured above, and they will print on a standard sized printer.

1. Outline Only (no program needed). Find some (thicker) scrapbook paper you want to use, cut it down to fit into your printer (about 8.5 inches) and print the outline on the sheet. I would recommend cardstock, or your box is going to be pretty flimsy. Buy double-sided cardstock and your box will be decorative inside as well! This file is saved as a .jpg, so you can just print it as a picture.


Here is another link to download the file: Take-Out Box Outline

2. Template (program needed)
This option is for my fellow digital scrapbookers. The template includes a variety of options.
  • There is an outline only layer, so you can print it on paper of your choice. Change the color of the outline to match the paper you have so it will blend in. Buy double-sided cardstock and your box will be decorative inside as well!
  • One layer covering the entire template. Clip your digital paper on and turn off the outline layer to print.
  • One layer covering all sides of the box. Keep the outline layer on so you know where to cut the flaps. Clip your digital paper on, change the outline color to match your paper, and print. The bottom and the flaps of the box will stay whatever color your paper is.
  • Separate side layers. This option is best for paper that is only one direction. For example, if you use paper with words, you don't want the words to be upside down on one side of the box. Clip your digital paper onto these separate side layers and rotate it for each side.
  • A layer called "Cut Lines/Dots/Notches". Print these on all the above options, so you can clasp the top flaps together. The dots tell you where to punch your holes for wire/brads/eyelets. The notches are on the two side flaps to tell you where to fold them.
  • Finally, there is an instructions layer if you're not sure how to put it together, but I wouldn't recommend printing it on your projects. :)


Here is an alternate link to download the file: Take-Out Box Template

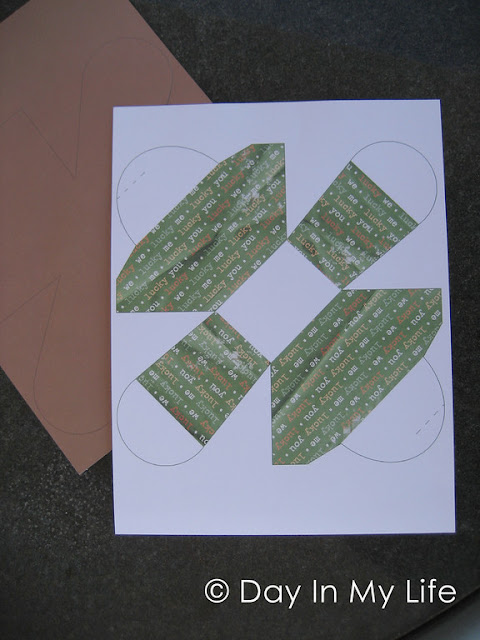
Here's a printed example of my use of the template (white cardstock with green printing), and the outline (brown and green double-sided cardstock):


I cut them both out, then folded them according to this diagram (this is the instructions layer included in the template):


If you find it more helpful, you can score all the folds first. Make sure you cut along the dotted lines so you can attach the bigger flaps together, and punch four little holes on the dots. How you want to do the handle is up to you; you could do ribbon and eyelets, or wire like I did.


Click here for a fortune cookie recipe to fill your cute boxes.

Comments

  1. Oh my gosh, they turned out so cute! I am totally impressed.

    ReplyDelete
  2. Thanks for the template, so cute! I'm attempting these for Christmas! :-)

    ReplyDelete
  3. wow these are great!!
    I am making several sizes for Easter decorations and place markers!!
    thanks,
    Julie

    ReplyDelete
  4. Oh my goodness you are AMAZING to think of this, and to share!!! THANK YOU !!!

    ReplyDelete
  5. Tiff, hi
    I wonder what kind of printers you have... :)
    do you also have a plastic covering machine to laminate which I saw here: http://tiffkeetch.blogspot.com.tr/2010/09/picture-matching-book.html

    ReplyDelete
    Replies
    1. Hey Ayse!
      I just have an old HP all-in-one (scanner, printer, copier). It still does the job! I do also have a laminating machine - it's made by Scott and it cost me about $25 at Wal-Mart (or Amazon has it too). I buy more sheets for it on amazon from Lamination Depot. :)

      Delete
  6. Thank you for these templates - I will use them for my sons's birthday parties (the both want a ninjago party).
    Greetings from Germany!
    Miri

    ReplyDelete

Post a Comment

Popular posts from this blog

This Much Card and a Kid Canvas

Father's Day ideas continued... I decided to show you the things Harvey and I made to give to Justin. First up... "I Love You This Much Card": It's super easy... 1. Trace your child's hand, then cut out two copies. My paper was double sided so I made sure that when the thumbs match up - the yellow side would be inside, and the blue side would be outside. 2. Cut out a strip of paper and fold it accordion style. Use letter rub-ons or stickers to add the words "I Love You" on the outside, and "This Much" on the strip of paper.  3. Glue the ends of your accordion strip on the insides of the hands and your card is done. :) Kid Canvas: Then Harvey and I made a little canvas (4 inches x 4 inches) to hang on the wall in Justin's office at work. I purchased small ones so we could add to them each year and hang them in one grouping. I prepainted the canvas in green, then set Harvey in the bathtub with blue paint and

Thinkin' About Dad

So.. Father's Day is in 10 days. Yeah - already. Here are a few ideas for you... Shirt Card: All you need are two papers, and two buttons. 1. Cut one paper into a piece 4 inches by 11 inches. Fold it in half so you have a card base that opens "up" and measures about 4 inches wide by 5.5 inches tall. 2. Measure one inch from the fold and draw a line 3/4 inches toward the center on both sides of your card.  Use scissors to cut through both papers at the marks. 3. Fold these pieces in to the center of the card, so the top corners meet in the middle. 4. Download this tie pattern... Here is an alternate link to download the file: Shirt Card Template ...and use it to trace and cut a tie out of your second paper. Glue your tie in the center of the card. 5. Add buttons to the collar to make it more realistic. (Or, if you want to do it digitally, go here to download an awesome template from ScrapMatters.com) Here are some clutter-free Father's Day gif

DIY Canvas Car Playmat

So, my baby turned two yesterday. And I just KonMaried my house and I am SO. OVER. the toys. And the kid clutter. Plus he has both a big brother and a big sister, and they have toys that cover all the basics. But we still have loads of birthdays and Christmases in our future, so what in the world am I going to give? Anyway, my internal brain rant ended when I came up with this idea. It meets all of my current criteria: It is durable.  It is open-ended and fosters imaginative play. It folds up small and can be stored with like-items in our toy storage system. It encourages cooperative play. My hubby had a mat like this one when he was a kid, so I asked my mother-in-law to give me some details on how to make our own. I bought 60 inches x 45 inches of duck canvas and ran a zigzag stitch down the raw edges. Then, (after planning out the city on graph paper measured and accurately scaled proportionately, then folding the canvas to help rescale my plan) I drew in the c