It seems like age three is a good time to start doing birthday interviews... but I missed my little guy's third birthday. I decided I'd better do something soon to capture my little Harvey before he got much older. His half birthday was last Sunday, so I got to work.
I made up a little double-sided printable that I can repeat every year... I've seen many versions of the birthday interview all over Pinterest, but I wanted to add a few elements of my own - like a place for a handprint, and a place to either attach a photo or let my child draw a self portrait. Plus, I wanted a little box to write stuff that didn't apply anywhere else.
After I printed a copy, I set up the video camera, sat Harvey in front of it.. and asked him the questions. It was thoroughly delightful to see what his answers would be.
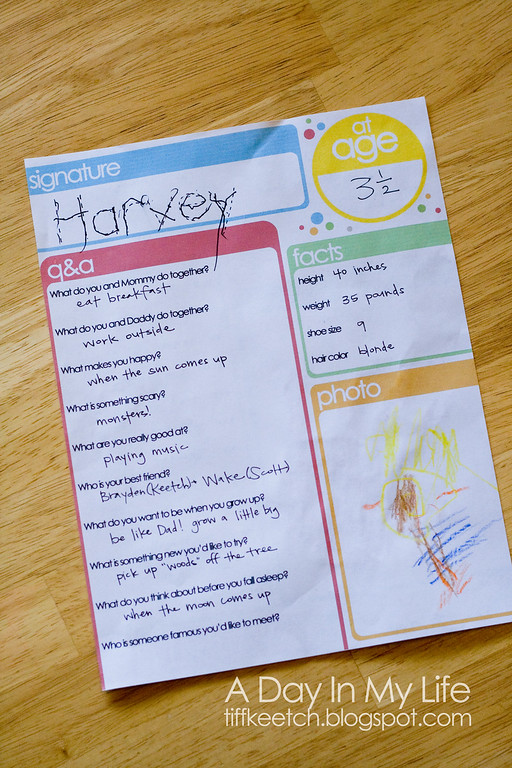

Harvey hasn't really traced letters much, so I helped him with the first letters in his name. But he did V, E, and Y all by himself. I was so impressed! I love his self portrait - I coached him... "Let's draw your hair. What color is it?...Oh, how about shoes?" (For my future self: The yellow on top is his hair, the big brown blob in the middle is his eyes, and the two little orange lines on the side are his arms. He drew blue lines for pants, and orange shoes at the bottom.)

It's funny what kids think and say. For some reason during the interview Harvey kept answering "fox" for many questions. I coaxed the real answer out of him on some, but on others he wouldn't budge from "fox." Anyway, I'm pretty sure his favorite song is "Twinkle, Twinkle, Little Star," and his favorite game is either wrestling with daddy, or the verbal games I play with him while I push him on the swings. And well... exercise as his favorite sport? That just makes me laugh! (Oh, and I just noticed that when I took this photo, I hadn't finished spelling Little Einsteins, because I wasn't sure if it was I before E... and apparently that little phrase doesn't work all the time. I'm glad I checked.)
Feel free to grab a copy if you'd like:
Here is an alternate link to download: Birthday Interview
Tiff I love this. I can't wait to see it on pintrest. You are one of my awesome friends that help me to look creative. I owe it all to you. Keep up the good work.
ReplyDeleteWhat a sweet boy you have. Cute pics.
I have been searching all over the internet to find something exactly like this cz my little guy just turned three! Thank you so much for your work, and for sharing it! It's perfect!
ReplyDeleteIve saved a couple of these and this is by far the best. I love the accomplishments and the handprint part. So great:) Thank you for sharing.
ReplyDeleteSuper cute! Thanks for sharing!
ReplyDeleteThis is the best one Ihave seen..It makes my heart happy..I love the handprint!! Oh thank you for sharing!I LOVE this!!
ReplyDeleteThank you for sharing!! So cute. Going to interview my birthday boy right now.
ReplyDeleteThis is the best and most visually appealing birthday interview sheet that I've seen! Thanks so much!
ReplyDeleteNever thought about this, but absolutely a great idea!
ReplyDeletei love this, thanks so much for sharing! i'm stealing your format and using it to make my daughter an interview book on mixbook. i've been looking for a good interview and this is the best one i've found for sure!
ReplyDeleteThank you for sharing! This is a great idea. Can you share what font you used? I would love to modify a few of the questions for our family. Thanks!
ReplyDeleteSure - I used Century Gothic. :)
DeleteThis comment has been removed by the author.
DeleteThanks so much for sharing, I love this!!
ReplyDeleteThank you for sharing! So cute and clever!
ReplyDeleteSuch a wonderful idea! Thank you for creating this! Would you mind sharing the .psd version so I can modify it more easily to include into our yearly photo book? Thanks and have a blessed day!
ReplyDeleteSorry, at this time I don't want to share any layered files... but you could always erase what you don't like and add text in Photoshop. I used Century Gothic. :)
DeletePlease let me know if you change your mind, I'd be happy to pay for it. Thanks!
DeleteLove this! Thank you for sharing, will be doing this with my 3yr old!
ReplyDeleteThis is wonderful! And I understand that you don't want to share your layered files but can you offer any guidance on how to create the borders you used in the document? Many thanks!
ReplyDeleteI LOVE THIS SO MUCH!! I was looking for something cute to supplement his baby book and this is just perfect!! The book goes up to 5 yrs- but they don't give you space for all the fun things that are on this sheet.
ReplyDeleteThank you so much for Sharing!! This will become a yearly tradition for us!
This is brilliant. Thank you so much for sharing. Soraya - Brazil
ReplyDeleteThis is my favorite one! I came across this 3 birthdays ago and have had to get by with other versions these past 2 bdays. So glad I refound this on pintrest tonight~ I will make sure to save it this time :D It is perfect!
ReplyDeleteOh yay, I LOVE this!!! Thanks so much for sharing!! :)
ReplyDelete