
Scratch & Win Valentine

This year I found the cutest Valentine ideas in the February issue of Better Homes and Gardens. Of course though, I had to make them cuter. ;)

For my hubby I made up this Scratch & Win Valentine Ticket:


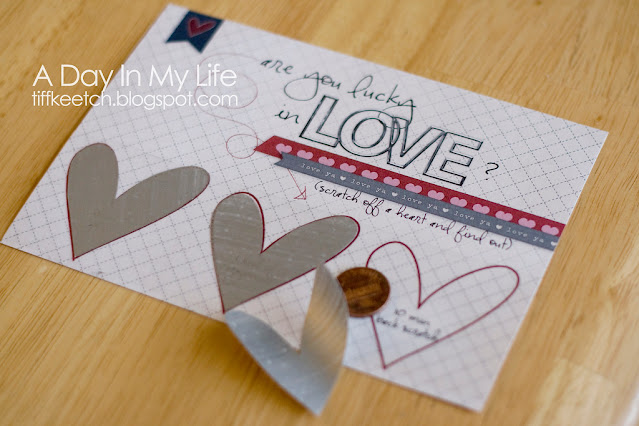
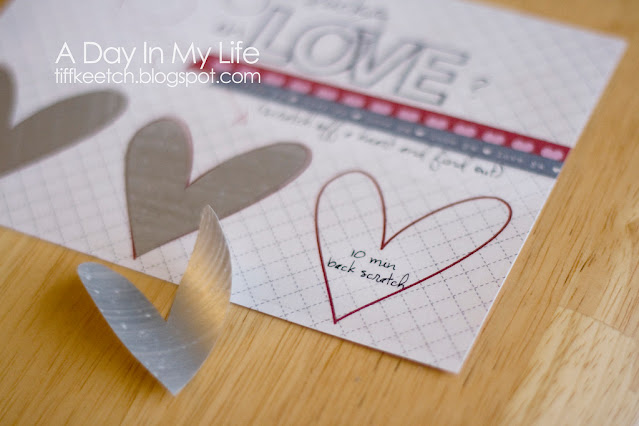
Okay.. bear with the photo - I didn't want to scratch it off before I gave it to my hubby, so this shows what is printed under the silver/scratchable heart.

Wanna make one?? It's really easy.

1. Make the background of your Valentine. I used the new He Loves Digital Scrapbooking Kit by Miss Mint at peppermintcreative.com. (If you don't digitally scrapbook, you could also just type the words in a word processor.) Type "prizes" in the heart shapes.


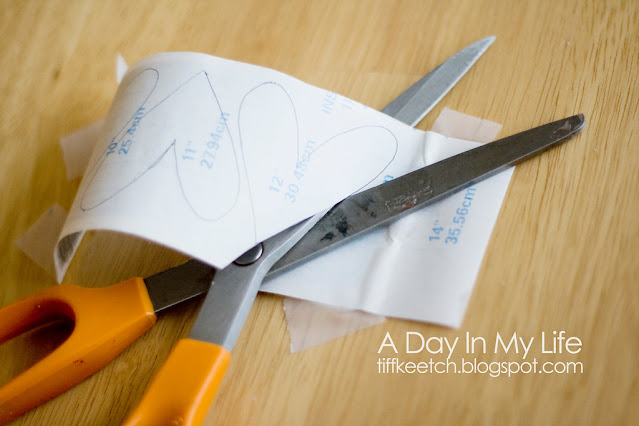
 2. Print the card onto cardstock and trim. Print the heart outline for a template. Cut a piece of contact paper long enough to cover all the hearts, and trace your heart template onto the back (paper side) of the contact paper. Tape the contact paper to a flat surface, paper side down.


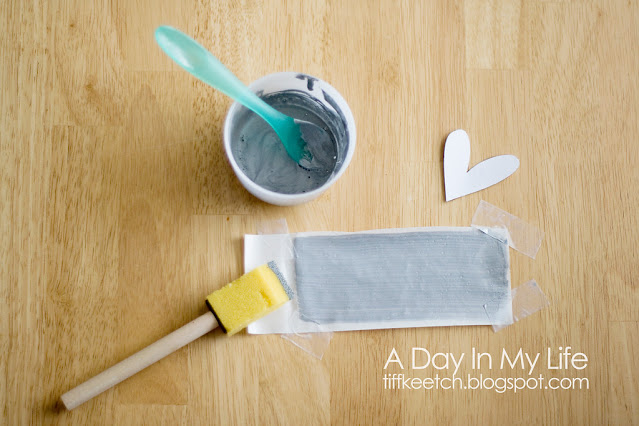
3. Make a scratch-off solution out of one part dishsoap to two parts silver acrylic paint. I knew I wouldn't use very much, so I used a baby spoon to measure. Using a flat brush, paint a thin coat of the solution on the top of the contact paper. Make sure you have covered all the area inside the hearts you traced on the other side. Let it dry for one hour. Repeat with a second coat.


4. Cut out the hearts (following your traced line), peel off the backing, and place over the heart spaces on the card. Package the card with a penny!


Pin It

Check back tomorrow to see Harvey's Valentine for his little friends... 

Comments

  1. I love it! I hope you are right that it's easy, because I want to do this. You may be getting a phone call for help. It's so cute.

    ReplyDelete
  2. Are you kidding me?? This is awesome! I'm already planning on doing your "love you this much" card for James' grandparents....this one could be perfect for the Hubs! Thanks for the great idea!

    Jessi
    http://cherishinghopesanddreams.blogspot.com/

    ReplyDelete

Post a Comment

Popular posts from this blog

This Much Card and a Kid Canvas

Father's Day ideas continued... I decided to show you the things Harvey and I made to give to Justin. First up... "I Love You This Much Card": It's super easy... 1. Trace your child's hand, then cut out two copies. My paper was double sided so I made sure that when the thumbs match up - the yellow side would be inside, and the blue side would be outside. 2. Cut out a strip of paper and fold it accordion style. Use letter rub-ons or stickers to add the words "I Love You" on the outside, and "This Much" on the strip of paper.  3. Glue the ends of your accordion strip on the insides of the hands and your card is done. :) Kid Canvas: Then Harvey and I made a little canvas (4 inches x 4 inches) to hang on the wall in Justin's office at work. I purchased small ones so we could add to them each year and hang them in one grouping. I prepainted the canvas in green, then set Harvey in the bathtub with blue paint and

Thinkin' About Dad

So.. Father's Day is in 10 days. Yeah - already. Here are a few ideas for you... Shirt Card: All you need are two papers, and two buttons. 1. Cut one paper into a piece 4 inches by 11 inches. Fold it in half so you have a card base that opens "up" and measures about 4 inches wide by 5.5 inches tall. 2. Measure one inch from the fold and draw a line 3/4 inches toward the center on both sides of your card.  Use scissors to cut through both papers at the marks. 3. Fold these pieces in to the center of the card, so the top corners meet in the middle. 4. Download this tie pattern... Here is an alternate link to download the file: Shirt Card Template ...and use it to trace and cut a tie out of your second paper. Glue your tie in the center of the card. 5. Add buttons to the collar to make it more realistic. (Or, if you want to do it digitally, go here to download an awesome template from ScrapMatters.com) Here are some clutter-free Father's Day gif

Our General Conference Center

I know, no one is thinking about General Conference right now. But tonight I'm showing my board to my mom's Relief Society group, and I wanted to have the printables available to them if they decided to complete this project. If any of you are interested... you have three and a half months to complete it. :) Two days before General Conference, I stumbled across this idea for engaging young children.... and I thought it was absolutely amazing. (And so are most of the ideas found on Jen Lund's blog - check it out!) One of the main reasons I love this idea, is that it doesn't just distract young children from being disruptive during Conference, but it engages them and encourages them to listen! I'm not gonna lie. It took time to put together, but I am positive that Harvey will enjoy working with this board. That will hopefully translate into Justin and I being able to listen, and that will make all of my hard work worth it in the end. Here's how i