While I was at Target to find a new garbage can that is Harvey-Proof, I walked past a Valentine display with cups, plates, bowls, and other festive tableware. One design caught my eye and I had to tell myself that one (or eight) Valentine salad plates would NOT be used enough to justify the purchase or the storage space. But then I started envisioning one of the said salad plates propped up on a stand, and decided that a homemade tile would look more classy than a plastic plate.
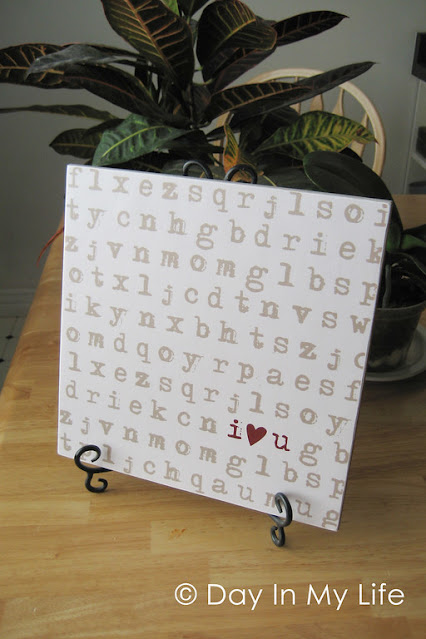
I snapped a photo of the plate with my phone, then came home and whipped up a picture in Photoshop. And because I think it's so adorable, I decided to share it so you could make one for yourself.
What you need for this project:
1. Start by putting a generous amount of Mod Podge on the tile, center/attach the picture and smooth it out. Make sure you get all the bubbles out. Put a huge box of diapers on top and wait a few hours for it to dry. (Mine took FOREVER because my tile had a seal making it *un*-porous. Try sanding your tile if you don't want to wait, and let me know how it goes!)
2. Using the exact-o knife, cut around the tile to cut the excess photo off. Sand around the edges to get a really smooth border.

I snapped a photo of the plate with my phone, then came home and whipped up a picture in Photoshop. And because I think it's so adorable, I decided to share it so you could make one for yourself.
What you need for this project:
- Mod Podge
- 12 x 12 inch ceramic tile (just get the cheapest one.. it will be covered up)
- My Valentine photo (make sure it's professionally printed - home computer prints wont work)
- Sanding block
- Exact-o knife
2. Using the exact-o knife, cut around the tile to cut the excess photo off. Sand around the edges to get a really smooth border.

How's that for cheap (I spent $3.75), festive, and easy?
This is WAY cute. Love this idea actually.
ReplyDeleteCUTE!
ReplyDeleteI LOVE this!! I have a quick question...what size photo did you print? 11 x 17? When I try to upload it to Walmart photo center, there's no square photo option.
ReplyDeleteCan't wait to get started!
Kelli,
ReplyDeleteI printed my photo at Costco.. and they had a 12x12 option. Maybe check some other places - Inkleys?
Or if you did 11x17 then you would have to cut off the bottom - make sure they don't stretch the photo to fit - and there would be a one inch border. You could mod podge some matching colored paper around the edge.
Thank you, thank you! I just ordered it!!
ReplyDeleteGosh, if I'd thought about it for about 3 more seconds, I would have figured out 11x17 wouldn't fit either! Sorry to be so spacey!!
I love this - thanks for sharing!
ReplyDeleteOmg! This is adorable!! What an easy DIY! <3
ReplyDeletevisiting from the csi project...this tile is sooo cute! You did a fantastic job! And sharing the photo with all of your readers...how sweet you are!
ReplyDeleteWOW! I love this! And cheap...even better! I'd love for you to share this at sundae scoop
ReplyDeleteLove it - thank you for sharing! I already had mine pinted in 8x10 for a frame (gift) today and going to pick up my 8x8 and 12x12 from Costco in the AM. Already have extra tile at home - can't wait to try it!
ReplyDeleteThis is adorable!! I had a couple of questions...Did you have any problems with the color running from applying the mod podge? Did you have this printed as a photgraph, or as a photo copy? And if not a photograph, what type of paper did you have it printed on?
ReplyDeleteIf you have it printed as a professional photo, the Mod Podge wont hurt it at all. However, if you print at home - even on photo paper - the Mod Podge will ruin the colors.
ReplyDeleteI had mine printed as 12x12 at Costco. Hopefully that helps!
Thanks for the image Tiff!! Hope to give this to Keith for V-day!!
ReplyDeleteI love the idea, but as I printed off the download it seems the letters are blurred. Does it still look good that way? I like the color of it.
ReplyDeleteI just tried to download again to make sure... and mine turned was full-sized, not pixelly.
DeleteThe font I used is like an old typewriter, so some of the letters look like they were stamped twice. Is that what you mean?
Not being picky, however, I want to do this project. Okay I am confused, why can't you use your photo printers at home? You would be using photo paper and photo printer. Are we to print it off and then take it to professional. Is that what you are saying? Print it on regular paper? I know my lights are on and nobody is home. However, I really, really want to do this and a little confused. bdtliv@msn. Di
ReplyDeleteMod Podge ruins home photo paper. At least with my inkjet printer, after I print and put Mod Podge on top all of the colors bleed and turn pinkish. But when you send the file and have it professionally printed, it doesn't effect the picture at all. I'm not sure why, maybe it's because it's laser printed?
DeleteI printed one 4x4 and two 8x8's. I put them on the tile and I think if you put too much on or if it isn't dry the pink shows up. The little tile is dry and I didn't notice it. I also put Mod Podge demention on it and i can't wait to see how it turns out. Very Exicted and thank for your help and come us with such a great project.
DeleteDi