This is just a quick list of everything I've added to my little one year old's 72-hour kit, because it differs slightly from our adult kits. Be sure to check out my comprehensive list for everything in my (and my husband's) kits. It has all the reasoning behind my choices, how I keep the kits rotated, and all sorts of other tips. Or you can check out my son's (age 4) young child version of the kit, as well.
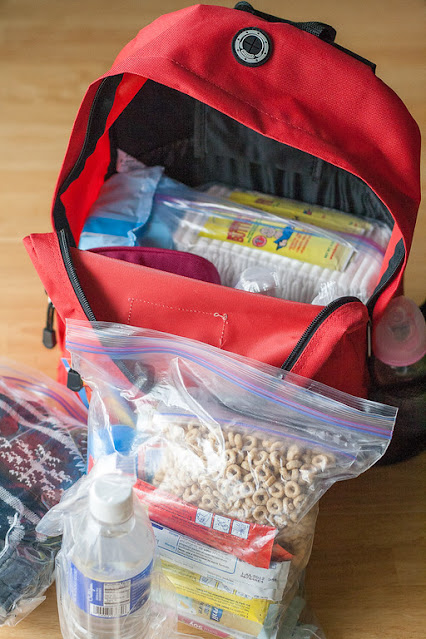
I purchased this kit from Emergency Essentials for each of my children. At the time it was only 25 bucks, and seemed like a great deal for everything plus the backpack. I store each grouping of items (clothing, entertainment, etc.) in a separate gallon sized Ziploc bag. This makes the pack virtually waterproof, it's much easier to find an item, and the bags can be used for all sorts of things (think garbage or water storage) in an emergency.
On the outside of the backpack, I've attached an ID card for Avery. On one side, it has her name and our family's contact information. There are also 2 locations of where our family would meet after an emergency (one in our neighborhood, and another one out of it - if our neighborhood was unsafe), an out-of-state contact and a place for allergy information. On the other side, I've included a recent family picture so the hopefully-nice-and-helpful-adult that finds Avery would know who to look for if she was lost. I plan on updating it at least once per year to keep the photos current (it's a new addition). For now, I store everything in a small ziplock bag, so everything stays waterproof yet I can still easily slide a new photo in each year. I'm debating if that is sturdy enough; laminating might be a better option.
Water & Food:
So.. Avery and I are now in the weaning process but even when I was nursing full time, I felt like it was wise to pack another source of food. What if Justin is the only one home when he needs to evacuate and we can't meet up for a day or two? What if we get separated after? What if, heaven forbid, I died? Because of all of that, I've decided to pack formula and water. Besides, it's the easiest way of making sure she would get enough calorie intake.
Clothing:


During Avery's first year, instead of sweats I included a blanket sleeper (with arms and a pouch that zips up). It could be used as a separate outfit if needed, or a warm extra layer. I also added an extra pair of pajamas because blowouts are more common, and there was more room when everything was smaller. Oh, and I added her SwaddleMe to the Grab List because she could NOT sleep without that thing.
Personal Care Kit:

Grab List:

On the outside of the backpack, I've attached an ID card for Avery. On one side, it has her name and our family's contact information. There are also 2 locations of where our family would meet after an emergency (one in our neighborhood, and another one out of it - if our neighborhood was unsafe), an out-of-state contact and a place for allergy information. On the other side, I've included a recent family picture so the hopefully-nice-and-helpful-adult that finds Avery would know who to look for if she was lost. I plan on updating it at least once per year to keep the photos current (it's a new addition). For now, I store everything in a small ziplock bag, so everything stays waterproof yet I can still easily slide a new photo in each year. I'm debating if that is sturdy enough; laminating might be a better option.
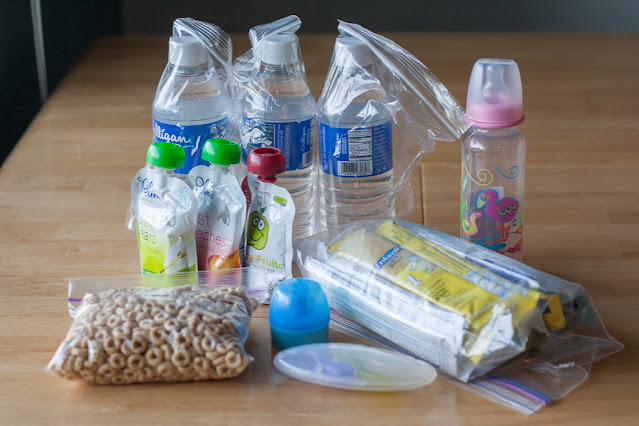
Water & Food:

- 3 water bottles (see the adult kit post for my water explanation)
- baby bottle with nipple
- 25 ready-to-go 4oz formula packets (For some reason I got a ton of free ones when Avery was born, and neighbors gave some to me as well. I like the idea of having them separated so the whole can doesn't get contaminated by water or something, but it would be cheaper to buy one can of formula.)
- 3 baby food pouches (this is how much I included 6 months ago when she was just starting solids, and this go around I'll include 9)
- Dispensing Spoons (you don't need these to eat food out of the food pouches, but I bought them when Avery was just learning how to eat solids, and after taking them on a trip they won me over. I could feed her with one hand and it was great. This link says they are unavailable, but I found mine at BabiesRUs)
- Cheerios
- Spill Proof Water Spout (attaches right onto a water bottle, making it spill proof. I like this one because it will grow with her, but you might want to consider the
Water Bottle Cap Adapter
because it's an actual nipple.)
- insulated bag (not pictured, but in the chance I could heat/cool something and I want to keep it that way for a while)
Clothing:

- wipes
- diapers (I fit 20 size 3 diapers in a gallon ziplock bag, and I added diapers to the Grab List if I had time)
- diaper rash cream (I threw these packets in with the diapers because I already had them on hand, but I also add aquaphor in with the personal items, which is double duty)
- 3 cloth diapers (can use them for all sorts of things, but ultimately, if my disposable stash runs out, I want to have something to resort to...)
- safety pins
- laundry soap ;) - still need to get this, which is why it's not in the photo
There are a few things I rotate more than every 6 months, and diapers are one of them. I regularly buy the big boxes of diapers, so when Avery switches to the next size up, we use the last of the old size from her kit and I replace them with the next size up.

- sweatshirt & sweatpants (one size bigger than they are currently wearing)
- 1 pair of footsie pajamas (can layer or use as a separate change of clothing if needed)
- 2 pairs of socks (cold, wet feet can cause lots of problems)
- hat and gloves
- small blanket (changing pad, warmth, extra "outfit" if needed)
My favorite tip for buying clothing for my childrens' kits, is to buy a sweat outfit a size or two bigger to put in the kit, then when it actually fits, pull it out (replacing it of course) and let them wear it as normal. Kids grow so fast, it's a waste to keep buying outfits (even cheap ones) for the kits. We love camping as a family, so I usually buy sweat pants and shirts for those trips anyway. Now I just do it a year earlier... One size bigger wouldn't be a big deal for the kids to wear in an emergency, and it saves having to buy a lot of extra clothes that likely won't get worn.
During Avery's first year, instead of sweats I included a blanket sleeper (with arms and a pouch that zips up). It could be used as a separate outfit if needed, or a warm extra layer. I also added an extra pair of pajamas because blowouts are more common, and there was more room when everything was smaller. Oh, and I added her SwaddleMe
Personal Care Kit:

- 2-3 Washcloths
- Wet Ones
- Shampoo
- Soap
- Hand Sanitizer
- Lotion
- Aquaphor (chapped skin or diaper rash cream)
- Toothbrush (only included because the one I bought for my son came in a 2 pack)
- Cotton Swabs (not pictured - I forgot to take them out of the front zippered pocket)
- Comb
- Kleenex
- Nail clippers
- Forehead thermometer
- Teething gel
- Anti-gas drops

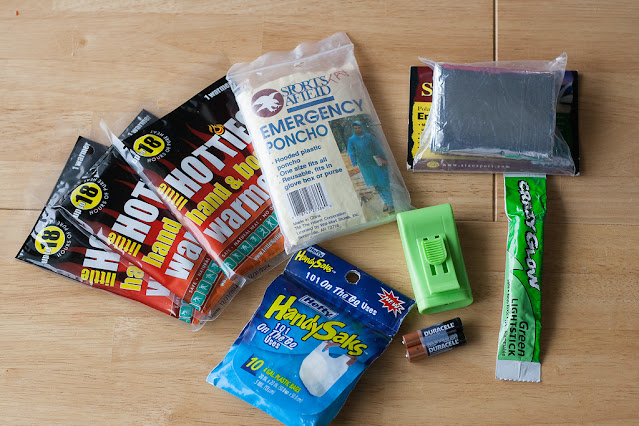
- 3 hotties (hand warmers)
- emergency mylar blanket
- lightstick & flashlight (more entertainment than anything, I'm sure)
- extra batteries (taped together so the ends wont touch and deplete power)
- poncho
- plastic bags (for dirty diapers)
Entertainment/Comfort Items:


- binki and tether
- blankie (I made a mini version out of the extra fabric I had when I made her larger ones..)
- small toy
I rotate the kids' everyday toys when they start to get old. I try to remember to swap out the toys in their kits when I do it, but it doesn't always happen.
- coat and sturdy shoes for Avery (stored in the same closet as the kit)
- baby carrier (stored in the same closet as the kit)
- stroller
- SwaddleMe
- extra diapers (if time)
- couple of extra toys (if time)
Is there anything I missed?? Leave a comment and let me know!
Check back tomorrow for a peek at our Emergency Binder...
You can also get the dispensing spoons at Target. :)
ReplyDeleteI thought I saw them other places but I couldn't remember where. Thanks for letting us know!
DeleteYou can also use your large diaper bag because you regularly update it as your baby grows.
ReplyDeletePrepareLDSFamily.blogspot.com
That's a great idea! For those people who have huge diaper bags... I'm a minimalist, so I just have a little grab bag with diapers, wipes and a few little trinkets, but that is definitely something to consider for those with big bags!
DeleteThank you for this! I have been intimidated by putting together a 72 hr kit for my 9mo old, but now it doesn't seem so scary! Thanks for helping me be more prepared!
ReplyDeleteGlad to help!
DeleteI would add sunblock, Avon skin so soft (less toxic bug repellent), a waterproof diaper cover for the cloth ones (100% polyester fleece is water reppellent), bucket type hat, sham wow type towel and 2 microfiber washcloths, baby liquid castile soap has more uses then just washing baby, safe for dishes and clothing too and a couple drops goes a long way.
ReplyDeleteAlso I have 4 kids and the last thing I want is my toddler to wander off in a panic situation so I keep a sling (tube type carrier) and a child harness in my 22mo old's kit. Normally I dislike leashing kids but I'd rather know where mine is if I can't carry her or a stroller in unavailable.
Those are great ideas! I hadn't heard of baby liquid castile soap - I'm going to check that out. And HELLO - I can't believe I forgot a waterproof diaper cover. Thanks!
DeleteI do have sunblock in my kit, but I should probably add some to the kids in case we get separated, and a child carrier is on my grab list as well. :)
Love your list. Reminds me I need to update my one-year-old's kit! What foods would you put in a kit for a one year old? Cheerios or other cereal snacks are great, so is baby food, but what about when they're transitioning between baby food and eating like the rest of us?
ReplyDeleteThis go around, I added more baby food, and a snack bag like the rest of us have. My little one will eat tuna on crackers, raisins, even trail mix now, so those will work. I'm also debating about updating the formula to toddler formula only for the calorie intake (she doesn't drink it now), but I'm leaning toward the fact that in an emergency situation, the formula I have packed would probably work fine.
DeleteMy next step is to do a taste test on the emergency bars to see if she would eat them... and find out if they are dairy-free because she is allergic, but that's another story. ;)
Here's a link to my son's kit: http://http//tiffkeetch.blogspot.com/2012/09/72-hour-kits-child-version.html
Hi, I love your breakdown of each individual's 72 hr kit -very comprehensive! You've made comments about doing a post on your Emergency Binder but when I did a search through your blog I couldn't find it. Is that still in the works? I'd love to see it!
ReplyDeleteThanks again!
Oh man! I never did get around to posting that! I'll get on it asap. Sorry!
DeleteI love this bag idea and the cloth diapering substitute. Anyone considering the addition of cloth diapers might want to look at diaper covers and also something called a Snappi. The type of pin that is in the picture will most likely pop open and stab the baby, If you want to use pins, there are pins made for diapering and can also function for other needs when not being used for diapering. Also, throw the prefolds in the wash a few times before using.
ReplyDeleteThanks for the heads up! I haven't ever used a cloth diaper, so I had no idea there were special pins! I have also added a diaper cover as well.. :)
DeleteThis comment has been removed by the author.
ReplyDeleteI love this bag idea and the cloth diapering substitute. Anyone considering the addition of cloth diapers might want to look at diaper covers and also something called a Snappi. The type of pin that is in the picture will most likely pop open and stab the baby, If you want to use pins, there are pins made for diapering and can also function for other needs when not being used for diapering. Also, throw the prefolds in the wash a few times before using.
ReplyDeleteThanks for this fantastic list / suggestions. I have included a wet/dry bag in mine. Also, I am putting together two bags - one to have in my hall closet & one to have in my car in case we are not at home when an emergency strikes.
ReplyDeleteFYI - REI sells a great all-purpose soap CampSuds btw. It can be used for laundry, dishes, etc. You should check it out.
Thanks for the tip! I'm going to check out that CampSuds soap. And, I like your idea about having a kit in the car. I have been having that same thought as well. :)
DeleteGreat write-up, I am a big believer in commenting on blogs to inform the blog writers know that they’ve added something worthwhile to the world wide web!..
ReplyDeleteMother of the Bride Dresses
Wow i can say that this is another great article as expected of this blog.Bookmarked this site..
ReplyDeletebabygifts in jerusalem
Nice article and I want to appreciate you for sharing! read more
ReplyDeleteGreat article Lot's of information to Read...Great Man Keep Posting and update to People..Thanks Kinderkledij
ReplyDeleteReally I enjoy your site with effective and useful information. It is included very nice post with a lot of our resources.thanks for share. i enjoy this post. Wholesale Baby Formula
ReplyDeleteThanks for a very interesting blog. What else may I get that kind of info written in such a perfect approach? I’ve a undertaking that I am simply now operating on, and I have been at the look out for such info. Baby Bassinet
ReplyDeleteThanks for sharing us. Baby Powders
ReplyDelete