
Frozen Mango-Cream Cake


This dessert was simple to make.. although it used most of my kitchen appliances (stovetop, blender, food processor and a mixer!) Even though my kitchen looked like a tornado hit it when I was done, eating this delectable dessert was worth it in the end!

For the Crust:
Vegetable-oil cooking spray
1 ounce salted dry-roasted macadamia nuts (about 1/4 cup)
3 tablespoons granulated sugar
1/4 cup all-purpose flour
1 tablespoon unsalted butter, melted

For the Mousse:
1/4 cup fresh orange juice
1 envelope unflavored gelatin (1 scant tablespoon)
2 firm but ripe mangoes, peeled (each about 1 pound)
1/2 cup granulated sugar
3 tablespoons fresh lemon juice
1 cup heavy cream
1/2 cup confectioners' sugar

1. Preheat oven to 350 degrees. Lightly coat inside of in 8-inch spring-form pan with cooking spray. (Your dessert will look thicker than mine, because I only had a 10-inch spring-form pan.)

2. Make the crust: Pulse macadamia nuts and granulated sugar in a food processor until finely ground. In a bowl, combine nuts, flour and butter with a fork until mixture resembles coarse meal. Pour into spring-form pan, and press into bottom. Bake until golden brown, about 12 minutes. Let cool.

3. Make the mousse: Pour orange juice into a small saucepan. Sprinkle with gelatin, and let stand until softened, about 5 minutes. Heat over low heat, stirring, until dissolved. Remove from heat.

4. Cut one-quarter of one mango into 1/2-inch slices); cover, and refrigerate. Coarsely chop remaining mangoes. In a blender, puree chopped mangoes, granulated sugar, and lemon juice until smooth. With machine running, add gelatine mixture in a slow, steady stream, and blend until combined. Transfer to a bowl.

5. With a whisk or an electric mixer on medium speed, beat cream until soft peaks form. Add confectioners' sugar and beat until soft peaks return. Whisk one-third of the whipped cream into the mango mixture. Using a rubber spatula, gently fold in remaining whipped cream.

6. Divide mousse among molds, filling three-quarters full. Cover with plastic wrap, and freeze until firm, at least 4 hours (up to 1 week).

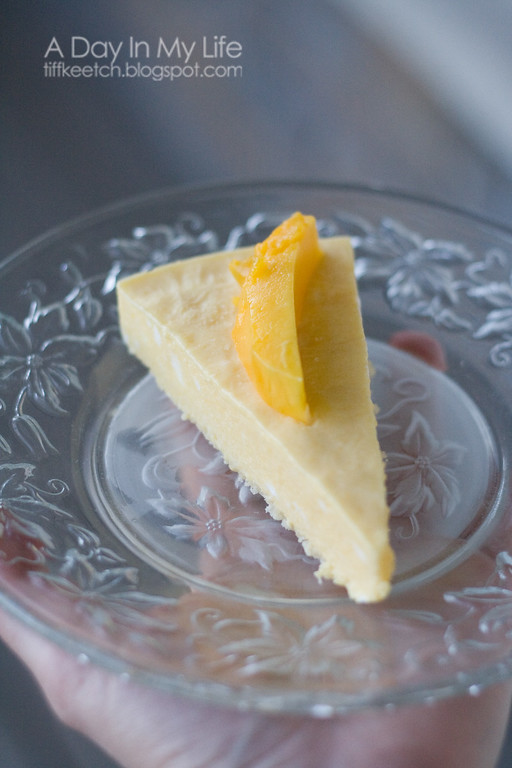
7. When ready to serve, let the cake stand at room temperature for 5 minutes. Gently push up from the bottom to unmold. Cut and transfer cake slices to plates and let stand 5 more minutes to soften slightly. Serve garnished with mango slices.

Comments

Popular posts from this blog

This Much Card and a Kid Canvas

Father's Day ideas continued... I decided to show you the things Harvey and I made to give to Justin. First up... "I Love You This Much Card": It's super easy... 1. Trace your child's hand, then cut out two copies. My paper was double sided so I made sure that when the thumbs match up - the yellow side would be inside, and the blue side would be outside. 2. Cut out a strip of paper and fold it accordion style. Use letter rub-ons or stickers to add the words "I Love You" on the outside, and "This Much" on the strip of paper.  3. Glue the ends of your accordion strip on the insides of the hands and your card is done. :) Kid Canvas: Then Harvey and I made a little canvas (4 inches x 4 inches) to hang on the wall in Justin's office at work. I purchased small ones so we could add to them each year and hang them in one grouping. I prepainted the canvas in green, then set Harvey in the bathtub with blue paint and

Thinkin' About Dad

So.. Father's Day is in 10 days. Yeah - already. Here are a few ideas for you... Shirt Card: All you need are two papers, and two buttons. 1. Cut one paper into a piece 4 inches by 11 inches. Fold it in half so you have a card base that opens "up" and measures about 4 inches wide by 5.5 inches tall. 2. Measure one inch from the fold and draw a line 3/4 inches toward the center on both sides of your card.  Use scissors to cut through both papers at the marks. 3. Fold these pieces in to the center of the card, so the top corners meet in the middle. 4. Download this tie pattern... Here is an alternate link to download the file: Shirt Card Template ...and use it to trace and cut a tie out of your second paper. Glue your tie in the center of the card. 5. Add buttons to the collar to make it more realistic. (Or, if you want to do it digitally, go here to download an awesome template from ScrapMatters.com) Here are some clutter-free Father's Day gif

DIY Canvas Car Playmat

So, my baby turned two yesterday. And I just KonMaried my house and I am SO. OVER. the toys. And the kid clutter. Plus he has both a big brother and a big sister, and they have toys that cover all the basics. But we still have loads of birthdays and Christmases in our future, so what in the world am I going to give? Anyway, my internal brain rant ended when I came up with this idea. It meets all of my current criteria: It is durable.  It is open-ended and fosters imaginative play. It folds up small and can be stored with like-items in our toy storage system. It encourages cooperative play. My hubby had a mat like this one when he was a kid, so I asked my mother-in-law to give me some details on how to make our own. I bought 60 inches x 45 inches of duck canvas and ran a zigzag stitch down the raw edges. Then, (after planning out the city on graph paper measured and accurately scaled proportionately, then folding the canvas to help rescale my plan) I drew in the c